Insulating a commercial building is a significant investment that directly impacts energy efficiency, indoor air quality, and long-term maintenance costs. For contractors and developers working in regions like Northern California, especially cities such as Petaluma and Sacramento, the climate and building codes influence the insulation choice more than in many other areas. Among the most common materials used in commercial insulation are spray foam, fiberglass, and blown-in insulation. Each comes with its own set of advantages and drawbacks, and understanding these differences is critical for making informed decisions.
Understanding the Climate Demands of Northern California
Northern California experiences a unique blend of climate conditions that vary across its geography. Coastal areas like Petaluma are subject to more moderate temperatures with relatively high humidity levels. On the other hand, Sacramento, located inland, encounters hotter summers and cooler winters. These contrasting climate zones require tailored insulation solutions that perform well under thermal stress, minimize moisture intrusion, and support long-term energy efficiency.
Commercial properties in this region must also meet California’s stringent Title 24 energy efficiency standards, making insulation performance even more critical. The right insulation not only contributes to regulatory compliance but also helps businesses reduce operational costs in the long run. Before choosing between spray foam, fiberglass, or blown-in insulation, it is essential to factor in how these materials behave under regional conditions.
Spray Foam: High Performance with High Investment
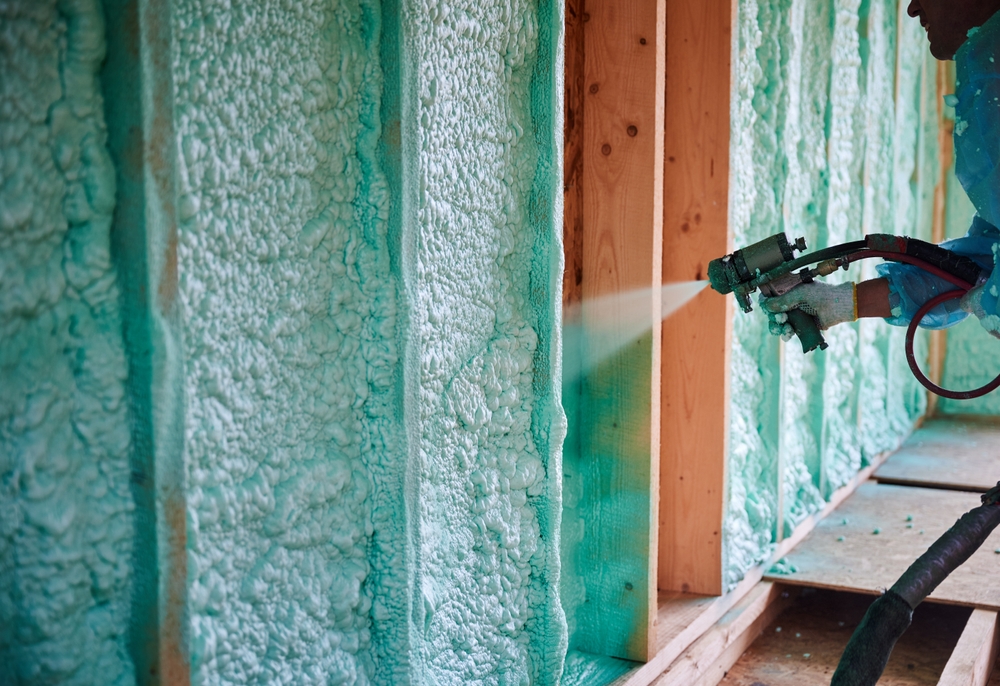
Spray foam insulation is often considered the premium choice due to its exceptional insulating properties and ability to seal gaps and cracks. It comes in two primary forms: open-cell and closed-cell. For commercial applications, closed-cell spray foam is typically favored because of its higher R-value per inch and moisture resistance.
In the Petaluma and Sacramento areas, where varying humidity and temperature shifts occur throughout the year, spray foam provides excellent thermal performance and air sealing. It prevents conditioned air from escaping and blocks outside air from infiltrating the building envelope. This air barrier quality is especially important for commercial facilities that prioritize indoor climate control, such as medical buildings, retail centers, and food storage units.
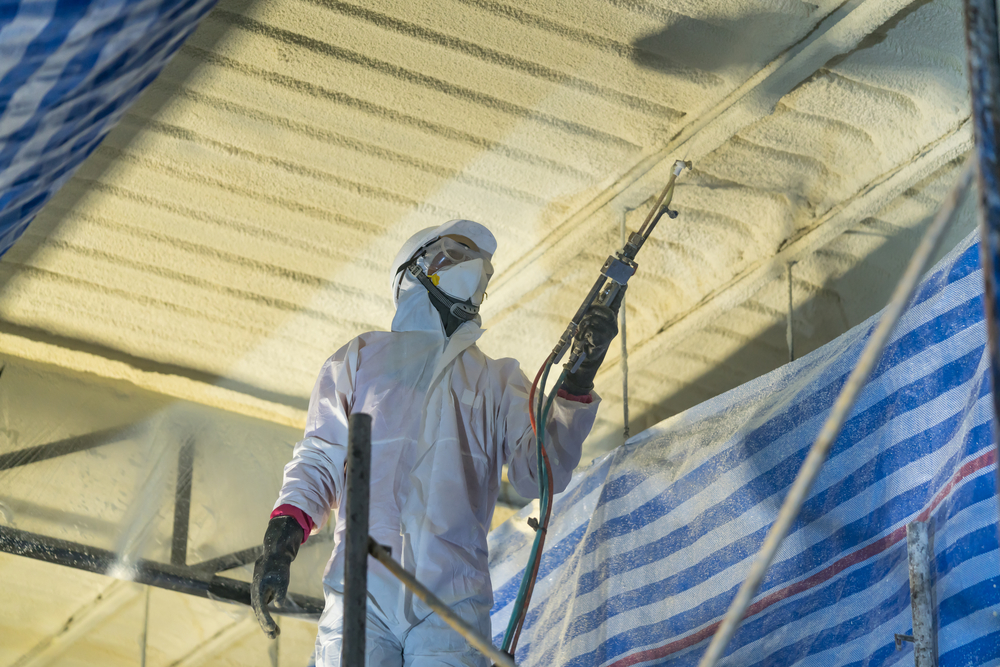
However, this level of performance comes at a cost. Spray foam is significantly more expensive upfront compared to fiberglass or blown-in insulation. Installation requires trained professionals and specialized equipment, which further adds to the expense. Despite this, the long-term energy savings and reduced maintenance can offset the initial investment, making spray foam an appealing choice for developers focused on sustainability and energy efficiency.
Fiberglass Insulation: Traditional, Cost-Effective, and Readily Available
Fiberglass insulation remains one of the most widely used insulation types in commercial construction. Its affordability and ease of installation make it attractive for projects with tight budgets or fast timelines. This material is typically installed in batts or rolls and is known for its resistance to fire and sound transmission.
For commercial buildings in Northern California, fiberglass is most effective in structures where walls and ceilings are designed to accommodate batt insulation during the initial build. In Sacramento, where summer heat can be intense, fiberglass helps delay heat transfer but lacks the sealing capability that spray foam offers. It is less effective at reducing air infiltration, which can lead to higher energy usage during peak seasons.
Petaluma’s slightly milder weather may make fiberglass a more acceptable option, especially in commercial applications where budget takes precedence over top-tier performance. However, it is essential to consider the risk of moisture accumulation. Fiberglass can trap moisture if not properly protected, leading to mold and deterioration. Using vapor barriers and ensuring proper ventilation can help mitigate these risks.
Blown-In Insulation: Flexible and Efficient for Retrofits
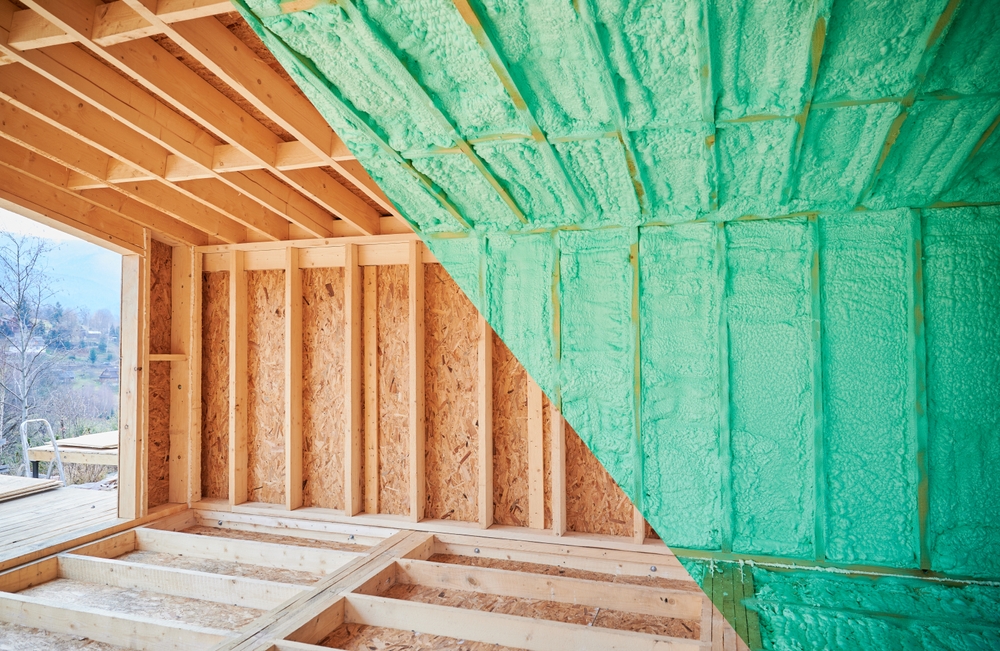
Blown-in insulation, made from cellulose or loose fiberglass, is another viable option for commercial applications, especially in retrofit projects. It is installed using pneumatic equipment that blows the insulation into cavities, attics, or hard-to-reach spaces, providing excellent coverage and a relatively tight thermal envelope.
This type of insulation works well in older commercial buildings in cities like Petaluma, where upgrading to modern insulation standards is often necessary. Blown-in insulation adapts to irregular spaces and can be added on top of existing materials, making it less invasive and more cost-effective for renovations. In areas like Sacramento, where cooling demands are high in the summer, blown-in insulation performs admirably in reducing energy loss through the roof and attic spaces.
Cellulose blown-in insulation is also environmentally friendly, as it is typically made from recycled paper products. However, it requires careful moisture management to prevent settling and mold. Loose fiberglass, while more moisture resistant, still has limitations in sealing air leaks compared to spray foam.
When considering blown-in vs fiberglass, the decision often comes down to the structure type and whether the building is new or being renovated. Blown-in insulation generally provides better coverage and thermal performance in older or oddly shaped commercial spaces. Fiberglass, on the other hand, is better suited for new construction with open cavities and standard framing.
Evaluating Your Commercial Insulation Needs
Choosing the right insulation material involves more than comparing R-values and prices. It requires a comprehensive evaluation of the building’s intended use, size, age, and location. In Petaluma and Sacramento, the differences in weather patterns and construction styles demand tailored solutions.
If the project involves a high-end commercial build with strict energy performance goals or involves sensitive equipment or inventory, spray foam offers unmatched insulation quality and air sealing. It is especially beneficial for facilities like tech hubs, data centers, or high-traffic office buildings that must maintain consistent temperatures year-round.
For developers focused on cost control or building out large-scale projects quickly, fiberglass remains a reliable option. It offers basic thermal protection and fire resistance at a lower cost, making it suitable for warehouses, general retail spaces, or light industrial facilities where climate control is less critical.
Blown-in insulation shines in retrofit scenarios and for improving thermal performance in existing buildings. It is also a suitable middle ground for budget-conscious developers who want better performance than fiberglass but cannot commit to the cost of spray foam.
The choice of insulation should also account for building codes, rebate programs, and environmental goals. Working with an experienced insulation contractor for builders ensures proper installation, code compliance, and long-term efficiency. Contractors in Northern California are well-versed in the local climate challenges and can recommend solutions that align with both budget and performance expectations.
Conclusion
Deciding between spray foam, fiberglass, and blown-in insulation for commercial projects in Northern California requires a balance between performance, cost, and application. Spray foam offers top-tier insulation and air sealing but demands a higher investment. Fiberglass provides a low-cost, straightforward solution best suited for new construction. Blown-in insulation presents a flexible and efficient option for retrofits or complex building shapes.
Ultimately, the right material depends on the specific requirements of the building and the goals of the developer. Whether working in coastal Petaluma or inland Sacramento, understanding how each insulation type responds to local conditions is key. Partnering with a knowledgeable insulation contractor for builders will ensure the project meets both energy efficiency standards and long-term operational needs. With careful planning and informed decision-making, commercial insulation can become a long-term asset rather than just a building requirement.
Need Insulation Near You?
Since 2001, Ace Insulation Inc. has been your premier insulation experts. We take pride in being locally owned and operated as well as offering high-quality service. We specialize in the installation of insulation. Whether you are building a new home or renovating your existing space, we are the place to call. We have many materials to choose from, including fiberglass and spray foam. If you are looking for high-quality work, call us today to schedule your next consultation!
Homeowners often think of insulation only in terms of energy savings or comfort, especially in colder seasons. While these are crucial aspects, insulation serves more than just an efficiency function. When your home’s insulation is compromised by pests or water damage, it becomes more than just a matter of performance. It turns into a health, safety, and long-term financial concern. Understanding when to replace insulation after such damage can prevent further deterioration and even structural issues. In regions like Nevada, spray foam insulation has grown in popularity, not only for its excellent sealing properties but also for its resilience. Still, even this high-performing solution can become ineffective under certain conditions.
The Hidden Costs of Pest-Compromised Insulation
Pest infestations bring more than just the visible nuisance of droppings, chewed wires, or foul smells. When rodents, insects, or other wildlife infiltrate attic or wall cavities, the damage they do to insulation can be both extensive and hard to detect at first. Rodents often tunnel through insulation, reducing its thermal efficiency. Their urine and droppings not only degrade the material but also pose serious health hazards, especially when particles become airborne and circulate through HVAC systems.
In traditional fiberglass insulation, pests find easy access and nesting opportunities. The compromised material begins to settle unevenly, creating gaps in thermal protection. This leads to increased heating costs during colder months, as your HVAC system works harder to compensate. Replacing damaged insulation after pest infestations is critical, especially if you’re pursuing long-term heating cost savings and indoor air quality.
While Nevada spray foam insulation offers a more pest-resistant structure due to its density and sealing capacity, no solution is entirely immune. If pests manage to penetrate or nest near the insulation, they may still degrade its performance over time. Once infestation is confirmed and pest control has addressed the root of the problem, it’s essential to inspect and assess whether the insulation has been compromised and should be removed.
Water Damage: A Silent Threat to Insulation Integrity
Water and insulation are a dangerous mix. Moisture intrusion from roof leaks, pipe bursts, or even high humidity can render insulation materials ineffective. In older homes, where fiberglass or cellulose insulation is prevalent, saturation from water flattens the material, destroying its ability to trap air and retain heat. Mold is another severe consequence, and once it sets in, insulation becomes not only useless but dangerous to health.
Spray foam insulation has the upper hand here, particularly closed-cell variants. It repels water and prevents moisture absorption, making it highly effective in damp environments. However, water damage around spray foam insulation, such as soaked studs or sheathing, can still result in hidden mold growth or structural rot. Therefore, even if the foam itself seems intact, surrounding materials may require replacement, and comprehensive moisture assessments are critical.
In homes impacted by water events, replacing insulation is not just about performance recovery. It’s about ensuring the building envelope remains dry, healthy, and safe. Restoration professionals often emphasize that drying and dehumidifying are only part of the solution. Replacing water-damaged insulation ensures you don’t trap moisture inside the wall cavity, which could lead to future complications.
Recognizing the Need for Replacement
The signs that your insulation needs replacement after pest or water damage might not always be obvious. In some cases, odors linger despite pest removal, or energy bills begin to climb without an apparent reason. In others, a winter inspection might reveal cold spots in certain rooms, prompting concerns about insulation gaps.
If you’ve recently dealt with pest infestations or water leaks, it’s wise to schedule a professional inspection. Experts use infrared thermography, moisture meters, and even small cameras to assess areas behind walls and ceilings. These tools can detect irregular temperatures or wet spots that indicate damaged insulation.
In Nevada, spray foam insulation is often chosen during home repairs or retrofits because of its long-term durability and ability to fully seal gaps and cracks. If your current insulation has suffered from contamination or degradation, replacing it with spray foam can provide both immediate and future benefits. Besides preventing air leakage, it acts as a barrier to allergens and contaminants, offering healthier indoor air quality.
The Value of Upgrading During Repairs
There’s a silver lining to insulation damage: the opportunity to upgrade. If your home has sustained pest or water damage and you’re already considering repairs, it’s the perfect moment to evaluate whether your current insulation is up to today’s standards. Many homeowners delay insulation upgrades due to cost or inconvenience, but when part of your insulation is already compromised, the cost-benefit balance shifts in favor of full replacement.
Choosing a winter insulation upgrade with spray foam is particularly strategic. As temperatures drop, having a tight building envelope becomes more crucial for comfort and energy savings. Upgrading not only helps recover from damage but also future-proofs your home from similar issues. Spray foam’s air-sealing characteristics block pest entry points and prevent air infiltration, making it a dual-purpose investment.
Energy savings from spray foam can be significant over time. In addition to keeping your home warmer in winter, it minimizes the workload on your HVAC system, extending its life and reducing maintenance needs. And while the initial installation cost is higher than that of fiberglass or cellulose, the return on investment through heating cost savings and resilience to future damage justifies the upgrade.
Making the Right Choice for Your Home
Deciding whether to replace insulation after pest or water damage involves more than just patching up what’s visible. It calls for a thorough assessment of your home’s envelope and a long-term view of indoor air quality, structural health, and energy efficiency. If you live in a climate with wide seasonal shifts, like Nevada, spray foam insulation delivers exceptional year-round performance and added protection against both pests and moisture.
It’s essential to work with licensed contractors familiar with your local climate and building codes. Not all insulation types are suited for all regions. Nevada homes, in particular, benefit from insulation that performs well in both summer and winter, making spray foam a compelling choice. An experienced contractor can also ensure proper removal and disposal of old, contaminated materials, minimizing health risks during the process.
Whether you’re reacting to damage or planning proactively, investing in better insulation pays off. From reducing energy bills to improving comfort and health, the right insulation choice can have a profound effect on your home’s performance.
Conclusion
Insulation is more than just a thermal barrier. It’s a critical component of your home’s comfort, safety, and efficiency. When pests or water compromise its integrity, it becomes essential to act swiftly. Ignoring contaminated or damaged insulation can lead to rising energy bills, poor indoor air quality, and even long-term structural damage.
Fortunately, this challenge also presents a chance to improve. By replacing damaged materials with high-performance options like spray foam insulation, you not only fix the problem but also invest in lasting energy savings and resilience. In states like Nevada, where seasonal extremes test the limits of your home’s envelope, a winter insulation upgrade using spray foam can yield immediate and long-term rewards.
Take the time to inspect, evaluate, and upgrade if needed. The benefits will be tangible in your heating cost savings, improved comfort, and peace of mind knowing your home is protected against future intrusions and damage.
Need Insulation Near You?
Since 2001, Ace Insulation Inc. has been your premier insulation experts. We take pride in being locally owned and operated as well as offering high-quality service. We specialize in the installation of insulation. Whether you are building a new home or renovating your existing space, we are the place to call. We have many materials to choose from, including fiberglass and spray foam. If you are looking for high-quality work, call us today to schedule your next consultation!
Upgrading to a smart thermostat is often marketed as a quick fix for high energy bills, especially during the winter months. Homeowners across the country, particularly in Nevada, are turning to smart home tech with the hope of slashing utility costs and increasing comfort. However, this strategy may be missing the mark. Before investing in high-tech gadgets or even replacing an entire HVAC system, it is essential to consider the core issue: how well your home retains heat in the first place.
In many cases, what seems like a problem with the HVAC system is actually rooted in poor insulation. If your home is “leaky,” meaning it allows indoor air to escape and outdoor air to infiltrate, your heating and cooling systems are working harder than they should. This reduces their efficiency, shortens their lifespan, and leads to higher energy bills. Let’s take a closer look at why insulation, particularly spray foam insulation, is a critical first step before making HVAC upgrades, and how this choice can bring you significant heating cost savings.
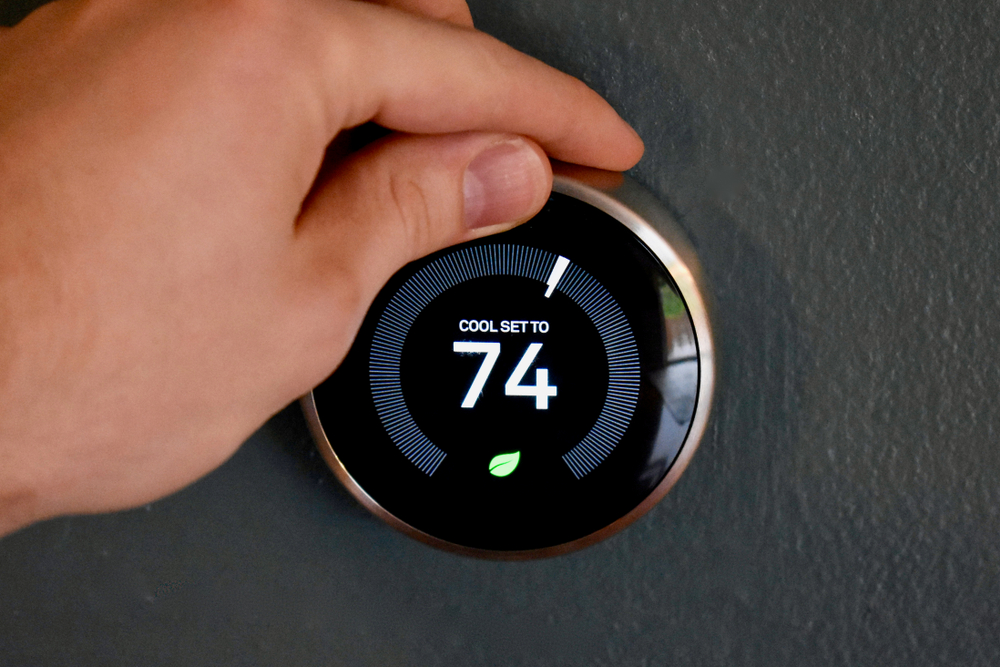
Why a Smart Thermostat Alone Isn’t Enough
Smart thermostats can help optimize how and when your HVAC system operates. They learn your habits, adjust settings based on weather forecasts, and even allow you to control temperature remotely. While they are effective tools for managing energy consumption, their ability to deliver savings is limited if the building envelope of your home is inefficient.
In a poorly insulated home, warm air generated by your heater seeps out through gaps in the attic, walls, or crawl spaces, and cold air creeps in. No matter how smart your thermostat is, it cannot change the laws of thermodynamics. The result is an HVAC system that runs more frequently and longer than necessary, leading to increased wear and higher utility bills. This is particularly problematic in climates with extreme temperature swings, such as Nevada, where winters can be chilly and summers scorching.
Without effective insulation to seal the house, even the most advanced thermostat becomes little more than a Band-Aid on a much deeper issue.
The True Value of Spray Foam Insulation
When it comes to effective insulation, spray foam insulation stands out as one of the most efficient solutions available. Unlike traditional fiberglass or cellulose insulation, spray foam expands on contact, filling in small cracks and hard-to-reach areas that other materials often miss. This characteristic makes it especially valuable for homes with complex architecture or those undergoing retrofits.
Spray foam insulation creates an air seal that significantly reduces air leakage, which is one of the primary culprits behind high heating and cooling costs. In the winter, it keeps the warm air in and the cold air out, resulting in noticeable energy savings from spray foam almost immediately. This effect is amplified in drafty, older homes that were not built with energy efficiency in mind.
In regions like Nevada, spray foam insulation offers dual benefits. During cold desert nights, it helps retain heat, providing comfort and reducing heating bills. During the sweltering summer months, it keeps conditioned air inside, easing the burden on your air conditioner. This year-round performance is why many experts recommend a winter insulation upgrade as a foundational home improvement.
Heating Cost Savings Begin with Sealing the Envelope
Many homeowners mistakenly prioritize furnace or air conditioner upgrades before addressing the insulation issue. While newer HVAC units are more efficient, their benefits can be negated if your home’s thermal envelope is compromised. Simply put, you are paying to heat or cool the outdoors.
The Department of Energy estimates that air leakage and insufficient insulation are responsible for 25 to 40 percent of energy used for heating and cooling in the average home. By investing in spray foam insulation, you can eliminate much of this waste. The upfront cost may be higher than traditional materials, but the return on investment is substantial when factoring in heating cost savings and reduced HVAC maintenance over time.
Spray foam insulation not only improves thermal performance but also enhances indoor air quality by sealing out allergens, pollutants, and moisture. This makes your home healthier in addition to being more energy-efficient. In Nevada, spray foam insulation also provides an added layer of soundproofing, useful for homes near busy roads or urban areas.
Winter Insulation Upgrade: A Smart Seasonal Strategy
Winter presents the ideal opportunity to assess your home’s insulation and make meaningful improvements. Cold weather can quickly expose weak points in your home’s thermal defenses. If you find that some rooms are consistently colder than others, or if your heating bills are unexpectedly high despite moderate thermostat settings, these are signs that insulation is lacking.
A winter insulation upgrade using spray foam not only prepares your home for the remainder of the cold season but also sets the stage for better energy efficiency all year long. Spray foam can be applied in attics, basements, walls, and crawl spaces with minimal disruption, and the impact is immediate. Your HVAC system will not have to work as hard to maintain a comfortable indoor environment, which extends its lifespan and reduces repair costs.
This proactive approach is particularly relevant for Nevada homeowners, where winter nights can be surprisingly frigid despite the state’s reputation for heat. A targeted insulation upgrade ensures you are not wasting money heating a house that leaks like a sieve.
Choosing Energy Efficiency Over Gimmicks
The marketplace is flooded with smart home products promising easy energy savings. While these tools have their place, they should not be the first step in your energy efficiency journey. The effectiveness of smart thermostats and high-efficiency HVAC systems is limited if the rest of your home is not equipped to retain the energy they produce.
Spray foam insulation is a proven solution with decades of performance behind it. It directly addresses the root cause of energy loss and inefficiency. Instead of repeatedly adjusting your thermostat or cycling through HVAC upgrades every few years, insulation offers a long-term fix. Energy savings from spray foam are not hypothetical; they are measurable and sustainable.
For homeowners in Nevada and similar climates, the combination of insulation and smart HVAC technology can be powerful. But it is essential to address them in the right order. First, seal the leaks. Then, let your HVAC system and smart thermostat operate in an environment where they can truly shine.
Conclusion
Investing in a smart thermostat may seem like a modern, tech-savvy way to reduce energy bills, but it cannot perform miracles. If your home lacks proper insulation, particularly spray foam insulation, you are losing valuable heat in winter and cool air in summer. This leads to overworked HVAC systems, high utility costs, and diminished comfort.
By starting with insulation, especially during the winter when energy consumption spikes, you lay the groundwork for meaningful heating cost savings. A well-insulated home not only enhances comfort but also maximizes the performance of every other energy-saving upgrade you make. In Nevada, spray foam insulation is more than just a good idea; it is a smart investment for a smarter, more efficient home.
Need Insulation Near You?
Since 2001, Ace Insulation Inc. has been your premier insulation experts. We take pride in being locally owned and operated as well as offering high-quality service. We specialize in the installation of insulation. Whether you are building a new home or renovating your existing space, we are the place to call. We have many materials to choose from, including fiberglass and spray foam. If you are looking for high-quality work, call us today to schedule your next consultation!
When winter approaches, many homeowners in California and Nevada start thinking seriously about energy efficiency and indoor comfort. While both states enjoy relatively mild climates compared to much of the country, winter nights can still be chilly, especially in desert regions and mountainous areas. If you’re looking for ways to cut down on utility bills while increasing the comfort of your home, a winter insulation upgrade can be one of the most strategic investments. Among the many options available, spray foam insulation has gained attention for delivering strong heating cost savings and long-term returns.
Installing spray foam insulation in December can have immediate and measurable benefits. From reducing energy waste to increasing home value, understanding the estimated return on investment (ROI) helps make the case for upgrading your insulation right before or during the cold season. Let’s explore the real numbers behind spray foam ROI and why it makes sense for homeowners in both California and Nevada.
Why Timing Matters: December Installation and Winter Heating Needs
Timing your insulation upgrade for December is not just a matter of convenience; it’s a tactical decision that can immediately impact your energy bills. Homes that undergo insulation improvements before the peak of winter can begin reaping energy savings from spray foam almost instantly. As heating systems work overtime during the colder months, any gaps in insulation become more noticeable. Warm air escapes through walls, ceilings, and attics, forcing your HVAC system to consume more energy to maintain comfortable indoor temperatures.
Spray foam insulation works by expanding to seal gaps and cracks, forming an airtight barrier that stops heat from leaking out. This helps your home retain warmth, leading to lower heating bills. The energy savings from spray foam can be noticeable within the first full billing cycle after installation, especially in older homes with insufficient existing insulation. In California, insulation cost recovery tends to happen faster in colder mountain regions like Lake Tahoe or Big Bear, where the difference between outdoor and indoor temperatures can be dramatic. In Nevada, spray foam insulation proves particularly valuable in places like Reno and Elko, where winters are much harsher than in Las Vegas.
Calculating the ROI: How Spray Foam Pays for Itself
When calculating the spray foam ROI, several factors come into play: upfront installation cost, local climate conditions, heating system efficiency, and the size and age of the home. In general, the initial cost of spray foam is higher than traditional insulation types like fiberglass, but the long-term savings and additional benefits often justify the investment.
In California, insulation cost estimates for spray foam installation average between $1.50 and $3.50 per square foot, depending on whether it’s applied in attics, walls, or crawl spaces. For a typical 2,000-square-foot home, this could range from $3,000 to $7,000. Nevada’s pricing is comparable, although slightly lower in rural areas. However, the energy savings from spray foam often offset a large portion of this cost within the first few years.
National studies suggest that spray foam insulation can reduce heating and cooling bills by 15% to 30% annually. In colder parts of Nevada, this translates to $500 to $1,200 per year in savings. California homeowners in colder zones can expect similar numbers. This means the average spray foam ROI timeline can be as short as 3 to 5 years, depending on energy rates and household usage. When you factor in increased property value, fewer HVAC repairs, and better indoor air quality, the return becomes even more compelling.
Regional Benefits: How California and Nevada Compare
Though neighbors on the map, California and Nevada present different climates, building codes, and homeowner priorities. These regional differences affect both the energy savings from spray foam and the perceived value of a winter insulation upgrade.
California’s building regulations emphasize energy efficiency, especially under the Title 24 energy code. In cities like Sacramento and Fresno, where winters are chilly but not extreme, the benefits of spray foam lie more in year-round energy savings than winter-specific gains. Still, upgrading in December means homeowners can see heating cost savings sooner and qualify for seasonal incentives or rebates. In mountain regions and areas with higher elevation, like Truckee or South Lake Tahoe, winter performance is critical. Spray foam helps prevent ice damming and keeps internal temperatures stable despite freezing outdoor conditions.
Nevada, with its high-desert climate, has a more pronounced heating season than many people expect. Cities like Reno experience subfreezing temperatures and significant snowfall, making winter insulation upgrades highly valuable. Spray foam insulation is increasingly popular in these areas, thanks to its superior thermal resistance and air-sealing properties. Even in southern parts of Nevada, where winters are milder, homeowners are turning to spray foam to optimize overall energy efficiency. The added benefit of moisture resistance makes it attractive in places where humidity fluctuates between seasons.
Long-Term Value Beyond the First Winter
While the most immediate benefit of spray foam insulation installed in December is heating cost savings, the long-term value extends well beyond winter. Unlike traditional insulation that may degrade or shift over time, spray foam maintains its integrity for decades. It acts as both an insulator and an air barrier, reducing the need for HVAC maintenance and improving indoor comfort year-round.
California homeowners may also see added value in increased home resale price. Energy-efficient features are a major selling point in markets like San Diego, San Jose, and the East Bay. A well-insulated home often receives higher appraisal values and sells faster than comparable homes without modern upgrades. For Nevada homeowners, spray foam adds appeal in areas with extreme temperature swings, especially for buyers looking for move-in-ready homes with low energy overhead.
Another long-term benefit is improved indoor air quality. Spray foam reduces the infiltration of outdoor pollutants, allergens, and pests. In regions with seasonal wildfires, such as parts of Northern California, this barrier can help maintain healthier indoor environments, further justifying the cost of the upgrade.
Environmental and Incentive-Based Returns
Both California and Nevada are investing heavily in energy conservation programs, and that translates to direct benefits for homeowners. State and utility-based incentives can improve spray foam ROI by lowering installation costs or offering tax credits for efficiency improvements.
In California, insulation cost incentives are often tied to programs from the California Energy Commission and local utility providers like PG&E and Southern California Edison. These programs may include rebates for weatherization upgrades, energy audits, and peak energy reductions. Nevada Energy offers similar programs, especially for customers who pair insulation upgrades with smart thermostats or other energy-efficient appliances.
There is also the broader environmental impact to consider. Spray foam reduces overall carbon emissions by lowering energy consumption. For environmentally conscious homeowners, the knowledge that they’re reducing their footprint while also enjoying lower utility bills adds a sense of ethical return on investment.
Conclusion
Spray foam insulation installed in December can be one of the smartest energy-saving decisions a homeowner makes in California or Nevada. The combination of immediate heating cost savings, long-term energy efficiency, and increased property value creates a strong case for this winter insulation upgrade. Although the initial investment may be higher than other forms of insulation, the payoff is both measurable and meaningful.
From sealing thermal gaps to lowering monthly bills and qualifying for regional incentives, spray foam delivers tangible returns that begin right away and last for years. Whether you’re in the frosty mountain towns of Nevada or the cool valleys of Northern California, improving your home’s insulation before the heart of winter ensures you stay warm, save money, and build equity all at once. For homeowners seeking both comfort and cost-effectiveness, the energy savings from spray foam and the strong spray foam ROI are too significant to ignore.
Need Insulation Near You?
Since 2001, Ace Insulation Inc. has been your premier insulation experts. We take pride in being locally owned and operated as well as offering high-quality service. We specialize in the installation of insulation. Whether you are building a new home or renovating your existing space, we are the place to call. We have many materials to choose from, including fiberglass and spray foam. If you are looking for high-quality work, call us today to schedule your next consultation!
When winter approaches, homeowners along the California coast and in Nevada begin to look for effective ways to stay warm while keeping energy bills manageable. One of the most reliable solutions is improving your home’s insulation. Two of the most popular types are blown-in insulation and spray foam insulation. Each has its own set of advantages and limitations, and their performance can vary based on regional climate. This guide provides a thorough insulation comparison focused on how each option performs for California coast and Nevada home insulation needs, helping you choose the best insulation for winter upgrades.
Climate and Environmental Considerations
Understanding the environmental conditions of the California coast and Nevada is essential to determining the right type of insulation. The California coast typically enjoys mild winters, with relatively stable temperatures, high humidity, and minimal snowfall. On the other hand, Nevada experiences more extreme temperature fluctuations, with cold desert nights, dry air, and higher heating demands during the winter.
Because these two regions differ in their climate conditions, the type of insulation that works best for one area may not be suitable for the other. Homes along the coast may need insulation that deals well with moisture, while homes in Nevada require solutions that prioritize air sealing and thermal resistance. Choosing between spray foam insulation and blown-in insulation depends largely on how well each handles the unique demands of these locations.
Benefits and Challenges of Blown-In Insulation
Blown-in insulation is made from loose-fill materials, typically fiberglass or cellulose, and is applied using a blower machine to fill attics, walls, and other cavities. This type of insulation works particularly well for older homes or retrofit projects where access to wall cavities is limited. It settles into place easily and conforms around obstacles like wiring and piping.
For homes along the California coast, blown-in insulation can be a cost-effective and efficient choice. It offers decent thermal resistance for areas that do not experience severe cold and helps control sound, which is a useful bonus in coastal communities affected by wind and ocean noise. Installation is relatively fast and non-invasive, making it ideal for homeowners looking to upgrade without undergoing major renovations.
However, blown-in insulation has some limitations. Over time, it may settle and lose some of its insulating properties. It also does not offer a complete air seal, which means drafts may still occur in homes exposed to strong coastal winds or those built with older construction techniques. In humid environments, such as the California coast, blown-in insulation must be paired with proper ventilation to prevent moisture buildup, which can lead to mold or mildew over time.
In Nevada, blown-in insulation can still be beneficial, especially when budget constraints are a concern. But in homes with higher heating needs, the lack of airtight sealing may limit its overall effectiveness. When compared to spray foam insulation, blown-in materials offer less control over indoor temperature consistency in colder, drier climates.
The Advantages of Spray Foam Insulation in Winter Conditions
Spray foam insulation starts as a liquid and expands into a solid foam when applied, sealing every gap, crack, and crevice it touches. It provides superior air sealing and high R-values, which measure how well insulation resists heat flow. Because it hardens after expansion, it forms a tight barrier against both temperature fluctuations and air infiltration.
This makes spray foam insulation particularly suitable for Nevada home insulation needs. The desert climate and extreme temperature swings require materials that can keep warm air in and cold air out. Spray foam’s ability to create an airtight envelope around the home helps minimize energy loss and maintain consistent indoor temperatures throughout the winter. Homes in Nevada benefit from reduced heating bills, fewer drafts, and better overall energy efficiency.
Another advantage is moisture resistance. Although Nevada is dry, small amounts of moisture infiltration can still occur. Spray foam acts as both an insulator and a vapor barrier, offering dual protection against heat loss and water intrusion. It also strengthens walls and ceilings by adding structural integrity where applied.
However, spray foam insulation comes with a higher price tag than blown-in insulation. Installation requires professional expertise, and mistakes during application can lead to uneven coverage or poor performance. Additionally, homes on the California coast must be cautious about over-sealing with spray foam. While its airtight quality is a benefit in Nevada, in humid coastal regions it can trap moisture inside wall assemblies if not installed with proper vapor management systems. This can increase the risk of condensation and mold growth in wood-frame homes.
Cost, Installation, and Long-Term Value
Blown-in insulation is generally more affordable upfront. It requires less technical expertise to install and is often completed within a single day. This makes it an attractive option for California coast homeowners who may not need the extensive benefits that spray foam insulation provides. The cost of materials and labor is lower, and in many cases, existing insulation can be supplemented rather than replaced entirely.
The downside is that blown-in insulation may not provide the best long-term value in harsher winter climates like Nevada. It lacks the durability and thermal resistance that spray foam insulation offers. Settling can reduce its effectiveness over time, and it may need to be topped off or replaced after a decade or so.
Spray foam insulation, although more expensive initially, can provide better value over the life of the home. It has a longer lifespan, typically lasting the full lifetime of the structure, and significantly reduces heating and cooling costs. For Nevada homeowners, the investment often pays for itself in energy savings and improved comfort. For California coast residents, the return on investment may be less dramatic, especially if the climate does not demand high-performance insulation.
Another consideration is renovation flexibility. Blown-in insulation is easier to remove and replace if walls are opened during future remodeling. Spray foam, once cured, is difficult to remove and can complicate upgrades to electrical systems, plumbing, or HVAC ducts hidden behind walls.
Making the Right Choice Based on Location and Needs
When choosing the best insulation for winter, it is essential to match the product with the climate and performance expectations. Along the California coast, where winters are mild and moisture can be an issue, blown-in insulation offers a practical balance of cost, efficiency, and ease of installation. It can meet the basic thermal needs of coastal homes while avoiding the risks associated with overly sealed wall assemblies.
In contrast, spray foam insulation is often the superior choice for Nevada homes. Its ability to completely seal the building envelope makes it well suited to a dry, cold climate where heat retention is a top priority. For homeowners looking to make a significant investment in energy efficiency and comfort, spray foam offers unmatched performance during harsh winters.
Some homeowners may also consider a hybrid approach. For example, spray foam insulation can be used in hard-to-seal areas such as rim joists, while blown-in insulation can cover attic floors. This strategy allows for cost savings while still improving thermal performance and energy efficiency.
Each home is unique, and insulation decisions should be based on a full understanding of the property, climate conditions, and long-term goals. Consulting with a qualified insulation contractor can provide tailored recommendations for your specific situation.
Conclusion
Upgrading your insulation is one of the most effective ways to improve comfort and energy efficiency during the winter months. For homes on the California coast, blown-in insulation is often the best insulation for winter, offering a practical and affordable way to stay warm without over-engineering the building envelope. Its ease of installation and performance in mild climates make it a popular choice.
In Nevada, where winter temperatures drop more significantly, spray foam insulation stands out as the most effective solution. Its superior sealing capability and high R-value make it ideal for homes that need to retain heat and reduce energy loss.
When comparing spray foam insulation and blown-in insulation, the right choice depends on regional climate, budget, and long-term expectations. Both have their place in winter upgrade strategies, and when selected carefully, either can contribute to a warmer, more efficient home tailored to the unique needs of your location.
Need Insulation Near You?
Since 2001, Ace Insulation Inc. has been your premier insulation experts. We take pride in being locally owned and operated as well as offering high-quality service. We specialize in the installation of insulation. Whether you are building a new home or renovating your existing space, we are the place to call. We have many materials to choose from, including fiberglass and spray foam. If you are looking for high-quality work, call us today to schedule your next consultation!
Areas Served
Proudly providing residential and commercial insulation installation to Petaluma, CA and the surrounding areas including:
Certificate of Approved Applicator from SWD, approved to install quik-shield polyurethane foam and coating products in residential and commercial applications according to the standards and guidelines as set forth by SWD Urethane